Showing posts with label teacher tricks. Show all posts

Tech Tips for Teachers

Want to learn a few of the best tech tips for teachers in 2021? I've got you covered! I use so many little tricks to get things done faster that I am SO excited to share with you!

I have a lot of amazing shortcuts for you that will help you save so much time planning, prepping, and even when you're simply reading or playing on the computer.

I am going to organize this article (you know me, I love to organize!) into sections so you can save this as a reference and easily find the hacks again if you forget any of them. 

Best Teacher Tech Tips of 2021 will have 4 jam-packed sections:
- PDF Tricks
- Super Helpful Keyboard Shortcuts
- Browser Tricks
- Printing Ideas

Okay, first up!

PDF Tricks

If you find teaching resources online (who doesn't?!), you probably have A LOT of PDFs. But did you know there are so many ways you can use them?

Viewing all of the pages at once

One of my FAVORITE things I can't believe I didn't know for so long is how you can see ALL the pages in a PDF very easily (as big or small as you want) by simply clicking the arrow to the left of the page you're on then clicking on the 2 stacked pages.

This will show you ALL of the pages in the PDF at once and you can use the little slide bar to zoom in and out! You can't even imagine how excited I was when I discovered this.

Simply click the 2 stacked pages again to go back to the normal page view.

You know what this makes very easy? PRINTING!

Have you ever scrolled through a big PDF, one page at a time, writing down page numbers to print? That takes so much time! There is such an easier way.

Printing multiple pages in this view

After clicking on the pages stack to see all the pages at once, click on the first page you want to print. This will highlight it. Use CTRL + P to bring up the print box and hit enter. Done!

Want to print a bunch of pages from the same document? This is where it really saves you time.
- Hold down the "Ctrl" button on your keyboard when you click on one of the pages, keep holding it down while you click on more pages. This will keep highlighting the pages to save them as selected. 

Extra tip: You can let go of it and it'll save the ones you've selected as you scroll through. 

Just make sure you hold Ctrl down again before you click anywhere or use an arrow to go down. If you do that by accident, it will deselect the pages you've picked. I typically press Ctrl only when selecting a page then I scroll with my mouse. If you don't have a mouse that scrolls, you can drag the bar on the right side to scroll and it'll save your pages :)

This is SUCH a quick way to print a big document! So let's say you have one of my giant first grade math units open and want to print just 1 activity but not all of the pages of that activity. You want the kid directions, teacher directions, ONLY the challenge level puzzles, and ONLY the challenge level recording sheets. You could look at all the thumbnails visually to quickly find that center, hold down Ctrl while you pick just those pages out, go to File > Print, and it will have those pages already filled in the print box for you! Woohoo!

Seriously don't ever waste time writing pages down to print on a little note! 

I love being able to see all the pages, too - it helps me plan in my head :)

The Home button

I LOVE the "Home" button on my keyboard. Did you know that it will bring you back to the very 1st page if you click on it? This saves me sooo much time - I actually used to scroll all the way back up to the top of giant files. Ahh!

An example of a way this would be super helpful is if, let's say, you were using my Sight Word Sentences Center Cards and you wanted to print the new sight words for the week.

Well, it's a HUGE document because it has over 220 sight words cards included. They're listed in a big table of contents that you can click on from the 2nd page to immediately take you to the page that word is on. (The preview pictures of this resource on TpT will show you the word list so you know what I mean: Sight Word Bottle Cap Centers - look at the 2nd picture)

This sounds super convenient, right? But what about after you click on a word?

If you clicked on "these" to print it, now you're all the way on page 115 but want to go back to the table of contents to pick the next word to print because you learn 5 new sight words every week...

Click the "Home" button!

This will take you to the 1st page immediately! Looooove this trick.

The table of contents is on the 2nd page so you'd click Home then the down arrow once and you're back to the table of contents! So easy!

This is one of the big reasons why I love to include a table of contents page as one of the first few pages in big resources... because I personally use them this way! It's so much easier than using the bar or scrolling/clicking to get back to the top.

(If it doesn't work when you try it, click in the gray margin just off to the side of the page to make sure your mouse isn't clicked on a specific part of the page)

Also, if you want to get to the bottom of a PDF really quickly, the "End" key on your keyboard will take you to the last page of the document instantly. :)

Bonus tip: This works on websites too! Click Home to go back to the top of a page you're reading.

Super Helpful Keyboard Shortcuts

I am obsessed with keyboard shortcuts. O.B.S.E.S.S.E.D.

I use them constantly when I am on the computer. I use them so often that it's completely natural for me to use my keyboard to do pretty much everything for me while I'm working. I honestly hardly use my mouse because I have so many of them memorized.

If you use them enough, they become just as intuitive as typing. So I am going to share a few of my absolutely favorites with you! 

I've already mentioned a few of them (Ctrl + P to print, the Home button) and there will probably more throughout this article in other sections since I use them so frequently.

To use them, you hold down a button then press the next one. For example, to copy a sentence from this article, you already know that you highlight the text then you would hold down Ctrl and press C to copy the text. Then, you'd go where you want to paste it, and hold down Ctrl while you press V to paste it. The way I'm going to present them is Ctrl + C. This would mean you hold down Ctrl then press C. Okay, let's get started!

Key that looks like 4 boxes + L to lock your screen quickly

This one is super handy for teachers in case you want to lock the computers back to the screen that makes you log in. It will lock your screen when you press it. For me, it takes me to a picture where I have to type in a password to log back into my screen. I set this up on my computer so I can quickly password protect my computer when I'm not using it. Being able to press this in literally 1 second so I can jump up and off the computer quickly, while locking my computer so no one else can use it, is awesome!

Alt + Tab to switch between screens

I use this one so often that I forget that it even exists. I use it all day, every day... seriously.

Let's say you're working with 2 different programs but you want both of them to be full screen. Do not waste time using your mouse to click back and forth. 

When you're on one of them, simply hold down Alt then press Tab and let go. This will immediately take you to the other one. Do it again to go back. You can hop back and forth between the 2 windows so quickly and easily this way. 

Like I said, I do this ALL day without even thinking about it, to the point that I almost didn't include it in this list because I forget that it's not something everyone does constantly. 

Another fun fact: When you press Alt + Tab but don't let go of Alt, you will see all the windows you have open on your computer. If you continue holding down Alt and press Tab but DON'T let go of Alt, it will let you press Tab as many times as you want to go to each window to pick the one you want. I also use this all the time.

Ctrl + A to select all

This works in so many places. For example, me typing this right now... if I want to select everything I've written so far, I could hold down Ctrl and press A and it would select all of it.

If I'm inside a folder of files, if I press that, it highlights all the files. I use this a lot for renaming all the files in a folder quickly which brings me to...


F2 to rename a file

I rename files all the time so this saves me a lot of time. If you click on a file in a folder then press F2, it lets you immediately rename the file. Then press Enter when you're done typing to officially rename it. You can use the left and right arrows to go to the next file to rename it.

Let's say you just uploaded pictures of your kids doing my place value ice cream cones activity and you want to name all the new photos you just uploaded to something that describes that.

You can rename them ALL at the same time by pressing Ctrl + A that we just learned to select all the pictures in the folder THEN, press F2. Type in the image title you want (for example: Place Value Game) and press enter. 

This will rename ALL of your pictures Place Value Game (1), Place Value Game (2), and so on!

(Extra bonus: Ctrl + Z can undo renaming a file, moving a file, deleting a file... if you click it right after doing so)

Sooo much better than having 50 pictures named something like IMG_1004, IMG_1005... It makes it so much easier when you want to find a specific picture on your computer to be able to search by the name. (& I don't want you to waste time renaming each picture individually - oh my goodness the amount of time that would take to do!)

Which leads me to the next one...


Ctrl + F to find anything!

You can press Ctrl then F to find words. This works on websites. This works in anything you're typing into.... It works in a lot of places! It even works within the folders on your computer. I use it all the time to find files. 


Shift to select a specific row of files in a folder

Remember how I told you about Ctrl + A to select ALL the files in a folder? Well, you can also select just a row of them, or rows of them, with a simple keyboard trick.

Ready for it......?? In the folder, you click on the first picture/file in the series that you want THEN hold down Shift and click on the last picture in the row that you want. 

This will select all the pictures from the first one you click to the last one you click. Can you believe that?? It also works in other places! Use it right now to select words in this paragraph! Click the word "Use" then hold down Shift and click on paragraph! Did it just select that chunk for you? Isn't that cool? I've always clicked and dragged! I don't really use it for selecting text but I use it for selecting images all the time now that I know it exists.

My husband actually just recently shared this gem with me and I was equal parts excited to have discovered it & equal parts angry that he never told me it existed haha. Sometimes he randomly drops those little tech tip gems on me and I'm like, "Thank you so much... but WHY have you never told me that button existed?! But thank you!" :) 

You can use this tool to simply select a row of 5 pictures, let's say, without having to click on them all individually... or 5 rows of pictures where you know you want from the file to this file.

Bonus: You can also use the holding down Ctrl while clicking individual pictures/files to select the exact ones you want like I explained in the PDF section. This works for files in a folder too :)

Advanced tip: You can combine those 2 tricks too! Let's say you have a giant folder of pictures and you want to select a bunch of random ones. Click on the first one and hold down shift then click the last one in a series.... then hold down Ctrl to individually select another one you like... or hold down Ctrl AND shift to keep all the ones you already have selected but do the Shift trick again. I hope that makes sense! This will allow you to select multiple chunks of pictures and individual pictures while skipping the ones you don't want to select.

Okay, another bonus (I told you I love my keyboard!): One thing I do a lot is sometimes I want to select all but a couple pictures in a file, I'll hit Ctrl + A to select them all... then I'll hold down Ctrl (so they all stay selected) then click on the ones I DON'T want to deselect them.


Ctrl + W

Now please don't do it on this window because I just rambled a bunch in the previous section :) but you can click out of a lot of things by using Ctrl + W! 

If you have a folder of files open, this will close it for you.

It doesn't work with all programs but it does work with some. I use it to close a lot to close things. Most often I use it for closing tabs I'm done reading.

Please don't do that right now, though, I have so much more to share with you! :) Especially if you like this one because browser hacks to save you time while online is next!


Browser Tricks

These are all my favorite browser hacks I use! They may be different on your browser but this is how they work on mine!


Ctrl + T

So I just told you about Ctrl + W to close the current tab you're on. Well, Ctrl + T will open a brand new tab for you. I use this one constantly. If I'm reading on a website and want to search something really quick, I press Ctrl then T to open up a new tab instantly.

I am one of those people who has a million tabs open all the time, by the way... which I have solutions for you for that as well! 

Ctrl + N

This does the same thing except it opens the new tab in a brand new window.

I use this one a lot too if I want to start a new group of tabs.

Ctrl + Shift + T

This is probably my favorite of all of them....

Do you ever click out of a tab you're reading by accident? Hold down Ctrl then keep holding it down while you also hold down Shift then press T then let go.

This will re-open the most recent tab you've closed!

I. love. this.

Like I said, I have so many tabs open and sometimes I click out of them by accident. Or, more often, I click out of it then change my mind and want to reference it again really quick so I use this keyboard shortcut to reopen it.

You can also repeat this over and over to keep opening your most recent tabs you've closed until you find the one you're looking for.

Ctrl + R

I'm sure you already know this one but this will reload the page you're on. Saves you a few seconds rather than having to find the little button with your mouse. :)

Ctrl + clicking on a link to open it in a new tab

I pretty much open every link in a new tab while I'm reading so it doesn't leave the page I'm reading.

A quick way I do this is you hover over the link, hold down Ctrl, THEN click the link. This automatically opens it in a new tab while not leaving the one you're currently on. :) 

Let's say you're reading this article and I mention my Fact Fluency in First Grade post and it's linked in the text you're reading like that... and you really want to read it, but later... right now, you want to finish what you're currently reading... but you don't want to forget about that link. Well, you can simply hover over that link, hold down Ctrl, then click it to open it in a new tab, so you have it ready for you for when you're done reading this.

I hope that makes sense - it's how I always read websites! I don't like to get distracted while I'm reading a page I am interested in, but I often want to save something they mention for reading later, so I do that to put it in a new tab so that, when I click out of the one I am on, it's ready for me to read next.

This is also why I end up with a ton of tabs open, haha :)


Browser Extensions for Managing the 9389437543 tabs you have open

If you're like me and open a lot of tabs while you're reading/planning, you may want to look at a browser extension that will save them all for you. 

I use one where I click the little button and it saves all the tabs I have open in a list of links for me. I can go back to that list any time to find that link again. I can name the group of tabs I saved, too, or use Ctrl + F to quickly find an article I saved in my groups of lists if I remember what it was about. 

Sometimes I'm reading and open a lot of new tabs but then I want to get off the computer before I've read them all, so I'll use my extension to save them all in my list to read later.

Check out this list for helpful extensions including a tab management one:


Setting up the Row at the Top with Websites you go to often

I go to the same websites constantly - my email inbox, my store on TpT, the list I have of all my blog posts (to grab links), my favorite websites to read, and so on.

So I have all the ones I go to frequently saved in my row, so all I have to do when I open my browser, is click on the icons in that top row to go straight there.

If you find yourself going to the same websites constantly, don't waste time typing them into the URL bar. Make a little button for them.

If you use the same browser I do, clicking Ctrl + Shift + B (hold down Ctrl AND shift then press B) will hide and unhide your row. 

If you see it bouncing in and out of view while you press that, woohoo you have a row you can use! If not, you may be using a different browser than I do.

To add a website to your row, go to the website exactly where you want it to go - all the clicks to get directly to your inbox while logged in, for example. 
- Then, do Ctrl + D to bring up the save box
- Rename it to something simple like "Mail" so it doesn't take up a ton of space in your row
- Under "Folder" make sure it is putting it in your bar
- Hit enter

This adds it to the row across the top so you can click on it any time to go straight to that page. I do this a lot for specific pages that take multiple clicks to get to, so it goes straight there!

Use Ctrl + Shift + B to hide your bar if you don't want to see it & the same thing to display it if you do! I always leave mine up typically because I use it so often. I have so many in mine, though, that I've started naming them like Mail, FB, IG, P, Blog, TpT so that they're super short and I can save more in there.

Moving tabs

Since I mentioned I often have a lot of tabs open, sometimes I don't want to see them all. So I'll click on the tab (literally, the tab for the tab) and drag pulling down so it takes it out of the group of tabs into a new window. Quick little tip! You can click and hold and drag down to put it back into a group too :) 

You can also hold down Ctrl to select multiple tabs then drag down to move them all out of the group of tabs at the same time.

You can also use the shift trick I taught you to quickly select multiple tabs in a row by clicking on the first tab, holding down shift, then the last tab you want to select a row of tabs. A lot of these tricks I'm telling you (like holding down Ctrl to select multiple items) work in a lot of places so, once you know them, you can use them for a lot of things! For example, Ctrl + S is the "save" button for so many different programs. I click it constantly when working on almost anything to save as I work without having to stop and click. It's a habit by now. :)


F11 to make a website take up the full screen

This one is so helpful for when setting up activities on the computer for kids where you don't want them to have the ability to go to another website or click on something in the bar. Plus it looks less distracting for them. If you press F11, it'll get rid of the top part so it makes just the website full screen. Pressing F11 again will bring it back to the normal view. 

Bonus: If they want to go "back" on the website they're on, they can press Alt + left arrow. It's easy for them to remember because they know the left arrow means go back if they play any computer or video games. Kids learn these sorts of things ridiculously fast which, much like with my husband, I go, "Wait, how did you do that just now??" :)

Okay, I honestly have even more than what I've shared that I use but I feel as though I've written a ton in this section so let's move on to....


Printing Tricks for Teachers

There are a lot of fancy things you can do with a little tech help with your printer!

Some of the things I've already mentioned involved printing, but here are some more:


Making Your Own Bulletin Board Letters

Firstly, you don't have to spend a penny on bulletin board letters. They are SO easy to make and print yourself!

Plus, when you make them yourself, you can choose the exact font, size, color, style that you want.

I wrote this incredibly easy guide for making your own a few years ago:
DIY Bulletin Board Letters

It's super easy! So many teachers have shown me the absolutely adorable letters and bulletin boards they've made using my guide which is so cool to see. Please tag me @missgiraffesclass if you share pictures of yours - I love seeing them! :)


Printing Posters Half the Size

Do you have classroom posters you've bought? You can probably use them in more ways than just posters!

Maybe you want to make them half page posters so they fit easier in your room?

For example, I absolutely LOVE my Long Vowel Word Families Posters but if I were to hang them all up full page sized, they'd take up a lot of space.

So I print them 2 to a page so they are half the size!

All I do is Ctrl + P to print then click on "Multiple" and where it says "Pages per sheet:" I put 2.

This will put 2 pages on the sheet. In the "Pages" box I put the exact posters' page numbers I want if it doesn't automatically select them. You can also use the PDF page selecting trick I taught you for picking the exact posters to print :) See what I mean about how I use the same ones over and over?

I love this because I can make posters half the size if I want to.


Making Full Page Posters into Little Cards for Teaching

I ALSO make them into little teaching cards!

This is a great way to take posters you've bought and double them as center activities too!

To do this, select the posters you want and do the exact same thing but for "Pages per sheet:" put 6. You can also do 9 if you want them even smaller.

There's actually a lot of ways you can use these! Here are some fun examples:
- Make them into little playing cards (use 6 or 9 to a page) where kids can hold them up and quiz each other
- Use them yourself as little cards for reviewing at your small groups table
- If they're posters for a particular skill like my Prefixes Posters, for example, tape the little cards around the room and let kids find and read them or write them down as a center activity.
- Numbers posters and Shapes Posters you may already have bought can also be doubled as a super easy center this way too! They can put the number posters in number order, put little tiny card versions of Alphabet Posters in ABC order... there are all kinds of ways you can make them into games! They can build the number with cubes or blocks next to the little number poster.
- Send them home as study cards (this is a really useful way to use them, especially Phonics Posters!)
- Laminate them, punch a hole in the corner, and put them on a ring so kids can use them as reference

I always like to get a lot of uses out of anything I buy so I figured these tips may be helpful for you if you already have posters you've bought over the years. You can reuse them in fun ways by simply printing them smaller! I put links to some of the sets I have to give you visual examples of what I mean, but I encourage you to look at the posters you already have and see if you can reuse them!

I know I have a ton of posters sets and so many of them can be repurposed into centers, study cards, small group reviewing cards, and so on!


Using the Same "Multiple" Feature to Create Picture Sheets of PDFs
You can also use this feature to print the pages in a PDF all on one sheet by selecting 16 "Pages per sheet:" so that it prints all the pages of the PDF on a single page (multiple pages if it's a big one) as little pictures.

This lets you see 16 pages of the PDF all at once! So visual and awesome for finding specific worksheets when you want them.

I actually do this when I print giant PDF resources sometimes so I have a little reference sheet of all the pages included. It helps me quickly find the page I'm looking for.

I actually print a page like this for ALL my big PDFs and keep them in a binder for each subject, organized by concept, so I can quickly find worksheets I want visually. For example, in my math binder, I have a reference sheet for each of my graphing PDFs all next to each other so I can flip to the little graphing section, visually look at all the pages within each unit and find the exact center or worksheet I'm looking for on my computer in minutes.

I hope this is making sense! It's just an extra way I like to organize my binders sometimes. If you read my Phonics Sounds Binders post, you know I love my binders! :)


Another example of how to use the printing 16 pages to a page idea:

Let's say you have my big teaching coins and money math unit but you also have several other PDFs of money worksheets and activities from other bloggers... print each one of the PDFs with the pages set to 16 to a page then slip those into a binder or in your "Money and Coins" file folder in your cabinet, so that when you need to find and print one of the worksheets or activities, you can use your little reference sheets to know the exact pack it's in to find it and print it.

You can also JUST take home those little reference sheets if you do planning at home, rather than your entire folder of coin activities.

This saves me a lot of time looking for worksheets! I even sometimes will print that page and clip it to all the pages I've printed from that pack, like I said, so I can just look at ONE page in my files to see if it's little picture is on there since it's on top of the papers it's clipped to. Super helpful for if I have a ton of printed pages for the same topic.

Bonus Tip: Did you know you can also print pictures in this way? If you have a folder of pictures on your computer: Select all the ones you want on the page. Use the right button on your mouse to click one of them then select print and then tell it how many you want on a page. It's a fun and easy way to print a little sheet of pictures straight from your folder :)


Okay I still have so many more but now I really feel like I've probably overwhelmed you with ideas! Or at least I hope you got a lot of new ideas! :)


Please let me know below if you learned any new tricks!! If you tried one and it didn't work for you, please ask so I can help clarify! These are all such huge time savers for teachers that I want to make sure you have all of them in your toolbox :)

There is A LOT of information here - I highly recommend you save it to reference later! 
How to do that: Hover over this picture & click "Save" or click here to go to the pin directly to save this to your boards so you can come back to it if you forget any of the keyboard shortcuts.

Tech Tips for Teachers - amazing list!!

If you think you'll use a lot of these ideas and to save this to your row we talked about, that's also a quick way to get back to this page when you need it!

I absolutely love sharing these sorts of ideas so if you loved this, you may also enjoy:

and really any of my blog posts! I sprinkle fun ideas to make things more fun and save you time throughout my posts :) You can see a big organized list of all of them here:

Miss Giraffe Favorite Blog Posts List
(You could also save this list into your row to come back to it :) Just saying! ha)

I also post lots of ideas as pins & on social media so you can go to the top of my sidebar to the right (click Home to go straight to the top!) ------>
to follow me where you hang out the most :) I do post different ideas on different platforms, though, so if you use more than one, I recommend following in more than 1 place so you don't miss anything. I also recommend following me on TpT so you see when I post new resources if you teach the primary grades. I love making resources and filling them with fun ideas too :)

Anyway, I'd love to hear from you below! Let me know if it was helpful or if you want to let me know more tech tips you want to hear about! You can also fill out this quick form (please make sure to check the box) to join Miss Giraffe's Class to receive fun emails from me so we can keep in touch! :)


Teacher Tricks for Math

Need some new teacher tricks up your sleeve for MATH?! I am really excited to share some of my favorite math teaching ideas that I use for instruction, centers, and independent work with you!

Make sure you also check out the Teacher Tricks for Reading and Writing I just posted recently too – and I’ve mapped out a lot more fun posts coming your way! :) I have included some affiliate links (I get a commission for purchases made through the links) in this post so you can easily find some of the things I show. I don’t care whether or not you buy anything – feel free to just idea scavenge if you want :) I just wanted to make it easy for you to find them!

Add magnets to the back of math cubes to use for teaching on the whiteboard. Click for a ton more math teaching tricks!

The first thing I want to share with you is adding magnets to the backs of math manipulatives. I love the magnets I have – you just peel the sticker off the back and stick them on anything to make it a magnet… LOVE!

Then you can use math manipulatives on the whiteboard when you’re teaching! You can do so many different counting, adding, subtracting, etc. activities with cubes on the whiteboard where kids can see visuals of your “thinking” as you move the cubes.

Great tips for how to make any math manipulative into a magnet to use on the whiteboard!

You really can put them on anything! If you’re teaching measurement with a ruler, put a few magnets on the ruler so it holds the ruler on the board in place as you hold things up to show kids how to measure items around the classroom. So much easier than trying to hold both!

A ton of math teaching tricks like how to add magnets to a ruler so you can teach measuring with a ruler on the whiteboard.

My favorite thing to use magnet-ed math manipulatives for is personal work trays! My dollar store has magnetic cookie sheets (for, yes, only a $1!) so I bought a bunch of them and they are PERFECT for so many things! I’ve shown you how I use them for word building with alphabet magnets in my Short A activities post but I also use them a lot for math.

Want to know another teacher trick? You can write on them with dry erase markers!!

Use a dry erase marker to write on cookie sheets to create a ton of fun math sorts! So many teach ideas on this site!

I was so excited when I discovered I could write on them with dry erase markers and it wipes right off! It allows you to make so many different activities right on the board and change them as much as you want to which is great for small groups or even independent centers. You can also use wet erase markers if you find the kids are wiping off the directions themselves.

Tons of math teaching ideas like adding magnets to the backs of pattern blocks to create sorts on a magnet cookie sheet.

You can easily change this sort from sorting shapes by how many sides the shape has to sorting the shapes by their name (or any sort you want!) by simply wiping off what you wrote and rewriting :) This makes it so easy to transition between different small groups or between kids.

Use a dry erase marker and magnets to create so many different math sorts on a dollar store magnetic cookie sheet - lots of great math ideas if you click the picture!

Also, since the cookie sheets are magnetic, kids can hold them in their lap to move around the pieces and have them stay in place. They can even hold them up and turn them around to show you their work without the pieces moving which is great.

Add magnets to the backs of pattern blocks so kids can build pictures that stay put! So many teacher tricks on this site.

Having the pieces stay in place is actually awesome for picture building with pattern blocks. No one is going to knock into their table and have the picture get messed up (cue the tears) and they’re not going to hit one block by accident that messes up the others, etc.
This is actually a great parenting trick as well if you have a younger kid on a long car ride – give them the cookie sheet and the pattern blocks with magnets on the back and let them make pictures in their lap while you drive. Pattern blocks are so much fun!

Awesome trick! Stick magnets to the back of pattern blocks so kids can use a magnetic cookie sheet to create pictures that stay put in their laps - great for long car rides too!

I have a lot more fun math ideas and games I showed that you can use with pattern blocks in my Composing Shapes post too!

Like I said, you can add magnets to the back of anything to make activities. You can add them to red/yellow counters and draw a 10 frame on the cookie sheet (or whiteboard) to do a ton of counting, adding, subtracting, etc. lessons!

Stick magnets to the back of red yellow counters for a ton of 10 frame practice to work on number sense, adding, subtracting, etc.

You can also use pom poms of any size by just sticking a magnet to the back. An easy game you can play (shown below) is to have kids roll 2 dice that are different colors and put that many pom poms in their 10 frame to add the 2 together.

How to add a magnet to the back of anything to practice ten frames in small group math lessons

So as you can see, the pink dice says 4 so they put 4 pink balls into their 10 frame and the orange dice says 3 so they added 3 orange balls. Then you can ask them questions like, “What number did you make?” “How many more to 10?” “How do you know?” etc. for math discussion with you or their partner.

Speaking of dice, I LOVE my big fat chunky colorful dice. I love that they come in cute colors and also have the white one with extra sides that goes up to 12. It’s great for challenging the higher kids or to use later on in the year.

These dice are my favorite for math centers and games... click to see where to get them

One math trick with dice that I love is to have kids roll the dice into a bucket! If they’re playing any sort of game or math center that involves dice, you can avoid having dice go flying across the room, off the table, etc. by having them roll into a bucket.

Have kids roll dice into a bucket so dice don't end up on the floor... and it's quieter too!

All you have to do is say that you lose your turn if your dice don’t land in the bucket and you won’t ever have dice on the floor again :)

It’s also a lot quieter than rolling on their desks or tables. You can even glue felt or foam to the bottom of the bucket if you want it to be even quieter. I have a few foam bottom buckets for quiet rolling and it’s wonderful.

Another way to keep dice off the floor is to use small containers just big enough to roll dice inside to make little shakers. You do have to use regular sized dice for those. I bought a pack of the small containers and made sets of them to throw in center buckets. Kids just shake them to roll their numbers. It’s so nice because you always know where the dice are, they don’t end up on the floor, and kids just grab them to use really easily when they need dice.

Put dice in little containers to create dice shakers for kids to grab and go during math centers... they're quieter and dice don't get lost on the floor!

If you’ve read my math posts, you know I use dice a lot for hands on math games so it’s nice to have a system for them. Another thing you’ll know from reading my math posts is that I use my number cards from Unit 1 (or you can also get them in Unit 11) for a ton of different things. I mentioned in my Building Number Sense post how I even use them for behavior management too so I wanted to explain that a little more!

Check out this trick for using your numbers chart as a classroom management strategy!

So this shows 50 but I usually start with 20 cards for the first time so it’s a quicker reward and also to solidify numbers 1-20. So, first, pick a reward that the class can earn that they’re really excited about (my favorite is an extra recess with popsicles) and have all the number cards showing in your pocket chart. Also print a second set of number cards, mix them up, and stack them upside down near the chart.

When the class gets a compliment for walking nicely in the hallway or the P.E. teacher says they were really good, whatever, tell them they’ll get to pick a number when you get back in class... OR during class, let’s say a group is working so quietly and well together during centers, say something like, “Wow, the blue table is working so hard and are so quiet right now – Aiden, you can go pick a number card.” He’d go up to the stack of number cards by the chart and pick a card. He’d show it to you then you’d flip that number over. When they flip all the number cards over, they get the reward! You could also have them earn mini rewards for completing a row or column.

Read about this fun classroom management idea that builds number sense at the same time... LOVE!

Once they get the awesome reward, they’ll want it again so you can do the number chart up to 50 this time! I recommend doing it up to 50 a few times. It’s great because it really gets them looking at the numbers and talking about them (“We only need to get 42 and 45 to finish that row!”). You can also incorporate learning by pointing to a flipped over number and asking them what it is. They’ll have to look at the numbers before/after/above/below/etc. to figure it out so it’s great number sense practice. You can also ask them what number they need to finish a row, count by 5s, etc. Even just have them turn to a partner and ask each other questions about it. You can get a lot of great math talk out of it!

If you have one of those awesome pocket charts that is specifically for displaying the 100 chart, you can also use that and just have as many numbers as you want to practice in it.

More fun things you can do is have them get something for finishing a row or column like I said above. Maybe they get a small reward for getting 10 in a row (when you’re using the 100 chart) like half an hour of free choice centers or something fun like that.

I have a lot more fun classroom management tips in my Chatty Class Classroom Management post and 20 Classroom Management Strategies You Can Start Right Away post if you want more behavior management ideas!

I use the number cards for centers all year. Another way I use them goes along with the next trick of sticking magnets to the back of base ten blocks to practice place value. I got a big set of plastic base ten blocks that I use – I think it’d work to stick magnets on the foam ones too but I’m not sure. I used to use foam ones but I like the durability of the plastic ones so that’s what these are.

How to turn your base 10 blocks into magnets to use for teaching in small groups or even on the whiteboard

You can just give a kid a stack of number cards and have them build each number on their cookie sheet with base 10 blocks. It’s great for building numbers and practicing tens and ones.

You could also do this on a magnetic whiteboard. A lot of the small whiteboards aren’t magnetic but your big classroom board or easel most likely is so you can use those to practice whole group. :)

Add a magnet to the back of base 10 blocks so you can use them to teach on the whiteboard or in other fun place value activities

I also use the same materials to play War. Just like the classic card game but with numbers 1-120 instead! If your kids aren’t ready for that big of numbers, just use number cards 1-50 or 1-100 or whatever you think they can handle.

Fun place value games and activities to play

The trick is to have them build their numbers with base 10 blocks to compare. Even if they say they know the answer, building it is great practice and really helps them see numbers conceptually as this many tens, this many ones, etc. which is amazing for building their number sense.

Another place value trick is to use a permanent (or wet erase) marker to write 1-10 on a ten block so kids can see what the 10 actually means and that each cube within the 10 is a 1. It’s a really great visual for students to see the “why” behind the vocabulary!

Write on place value blocks so kids can see what "tens" and "ones" actually mean... so many great math ideas on this post

Definitely read my Place Value in First Grade post if you want more fun place value ideas and to see the resources from my place value unit in action!

It also has tips for how to differentiate your place value lessons. Differentiating is really important to me – not just for your struggling students but for your advanced students as well like I talked about in my How to Keep Gifted Kids Engaged and Learning post. One easy way to differentiate is to use the different levels of worksheets (or centers) in my math units. The majority of the worksheets in my math units come in 3 levels for each concept – each one has a star in the upper right corner that says the level (A, B, or C) so you can easily give students the level that challenges but doesn’t frustrate them so they’re all working on the same thing but at their level. Another thing the worksheets also have is a self-reflection at the bottom where the student evaluates how they felt about the activity – was it too easy? Just right? Too hard? After they complete the worksheet, they circle at the bottom like this:

Awesome ideas for assessing understanding while your students work

See how they circled “Just Right” at the bottom of this page? This section lets you know how the activity was for them. They do this after they’re done with the activity. It only takes a bit of time to train them to assess their own understanding correctly. If you notice the little strip they clipped underneath, I have those in full page posters that I go over what each level means in easy to understand kid language (the posters are just bigger versions of the desk strips) so they can reference it.

Checking for understanding without any tests or grading involved... LOVE! Click to read how to use these!

I also shrunk the posters down into these little strips kids can keep on their desk and clip how they feel WHILE they work so you can walk around and see how everyone feels about the worksheet you’re doing so easily – I love it. If you see they’ve clipped that it’s too hard, you can stop to help them; if you see they’ve clipped that it’s too easy, you could give them the next level up version of the worksheet to work on instead. Then, you don't have several hands up waiting for you for help - they can keep working and trying until you get to them. They can keep it on their name tag so it's not in the way and you can use them with any subject/activity to always be able to do a quick check for understanding.

Instead of clipping, you can also cut the strips into 3 mini cards to put on a binder ring so they can flip to which one they feel like this:

How to differentiate and check for understanding without any tests or even grading... save this post!

The full page posters and desk strips are all in my Assessing Understanding pack if you want to use these in your own classroom. They’re really great for assessing understanding during lessons and also having students reflect on their own learning.

I also sort the papers kids turn in by what they circled. It’s quick to just sort them into 3 stacks by what they circled. If they circled “Too Hard,” I usually will take that stack out and put it at the small groups table so I know to re-teach that to them in a small group or go over it with them when they have a moment. I also often put it in their Student Drawer (which I have a blog post planned to show you my individual student drawers) so I know to help them with it later if it’s just 1 or 2 kids :)

Sorting into 3 piles can also help you make flexible math groups super easily. I don’t like math small groups staying the same for every concept because sometimes a high kid struggles with telling time and a low kid excels with fractions so you want to be flexible in your grouping when you can so everyone gets what they need for each skill. After I sort the papers into 3 piles, you’ll usually find it’s mostly “Just Right” to make 2 or 3 small groups with that you can continue on at grade level with the concept, a handful of “Too Hard” to pull back to re-teach the concept and work on it in a more hands-on and visual way, and a handful of “Too Easy” to pull back to extend the lesson and provide more challenging questions/work with the concept. It’s like having an assessment for every single concept without doing any grading or testing – win win, right?! :)

You can also have them put the cards on a binder ring next to them while they’re doing centers so you can see how they feel about the center too, even if there isn’t a recording sheet or paper involved.

Use a dry erase marker and a magnetic cookie sheet from the dollar store to create easy activities and fun sorts for kids

So if you were doing this simple color sort, if a student thought it was too easy, they would have the "Too Easy" card flipped showing. If they thought it was just right, they’d have that one flipped, etc. There’s a lot of sorts you can do with the cookie sheets like I said – you could change the one above to numbers instead of the color name and they put that many balls under it… or anything!

I hope you’ve enjoyed this list of math tricks! I’ve shown other math tricks on my other math posts in the past too if you want more! If you click on “Math” at the top of my site, it’ll take you to a list of links of math concepts I’ve written about so you can look at fun ideas to teach those concepts and such!

For example, in my Graphing and Data Analysis post, I show a trick for how you can use a fun daily graphing question to have your students take their own attendance each day AND sneak in a ton of learning.

In my Fact Fluency post, I show how you can take any cutting and pasting worksheet and turn it into a reusable center. That’s one of my favorite tricks for math and reading!

I haven’t written a complete post about using my math bottle cap centers yet but another trick is I love recycling bottle caps to use in math and literacy centers. Just write the numbers on the bottle caps and hand them the cards and they make really easy centers! I did show using bottle caps for phonics and word building in my CVC Bottle Cap Word Building post, though, if you want to see and bottle caps make appearances in some of my other posts too:)    

Thank you so much for reading – I’d love to hear from you in the comments! Happy Teaching!!

Teacher Tricks for Reading and Writing

Want some teacher tricks for reading, writing, and grammar? I am excited to share with you some fun ideas for literacy that you can use in your classroom or homeschool :)

I got a lot of positive response from my 20 Classroom Management Strategies You Can Use Right Away and Chatty Class Classroom Management Strategies and How to Help Gifted Kids posts where I compiled a lot of behavior management ideas so I figured I’d write some to show tricks for other topics like reading, writing, math, technology, parents, organization, centers, classroom set up, time management, and a whole lot more – I have a lot of posts planned and I’m really excited to share them with you all so make sure you check back often! I have included some affiliate links (I get a commission for purchases made through the links) in this post so you can easily find some of the things I show. I don’t care whether or not you buy anything – feel free to just idea scavenge if you want :) I just wanted to make it easy for you to find them!

Okay so first trick! You’ve probably seen in a lot of my literacy posts that I LOVE highlighting - a trick I love to use is labeling the highlighter!


Whatever you want them to highlight, simply write it on a white label and stick it on the highlighter. So easy!! For this activity, I just used one of my Short Vowels Reading Comprehension Passages to practice parts of speech (nouns, verbs, and adjectives).

My favorite highlighters are these chunky ones and you can use any rectangular labels like these rectangular self adhesive labels to stick on them and write what you want kids to highlight.

You can also have them highlight a specific phonics sound in a passage. You can also label each highlighter a different sight word for them to highlight when they come across it. Would you judge me if I told you I had a whole drawer of highlighters labeled with each sight word? :) It’s really visual for kids so I like this trick.

Speaking of highlighting, have you ever thought of highlighting words IN your pocket chart? Simply cut up transparent color binder dividers the size of a word and use them to highlight words on your pocket chart!


All you do is get transparent color binder dividers, cut off the tab and a straight line to cut off the 3 hole punches, and then cut what’s left into 8 equal size pieces. I fold it in half the long way, unfold, and cut along the line to get 2 strips. Then I fold the strips in half and cut to get 4 and then again to get 8 pieces total. They’re perfect for any literacy work in your pocket chart!


As you can see here, we’re working on AI and AY so we’re highlighting AY words in yellow, AI words in orange, and then also highlighting the sight word THE in blue when we see it. You can do it for phonics sounds, highlighting sight words, parts of speech, or anything you want to sort. You can do it whole group or even have students do it as a center.

I know I’ve raved about my magnetic pocket chart before but I just love it! It’s perfect for my daily graphing question (read my Graphing post if you want to see that) as well as a ton of math and literacy activities including the one above. For highlighting words, I just use index cards or basic sentence strips in the pocket chart then use the cut up dividers to highlight any sight words, parts of speech, words with the focus phonics sound, etc. 

What I use my pocket chart most for is my Phonics Pocket Chart Centers – I have them for the entire year of phonics sounds so they’re a weekly staple. I showed a lot of ways to use them in my Short A post, Digraphs post, EW UE UI post, etc. so you’ve probably seen them a lot but I wanted to show you another way to use them using DOLLAR STORE mini trash cans!


Are these trash cans not the cutest? And I got them for only a dollar each! I’ve shown you them before but I had to again because I am obsessed with these removable dry erase labels I stuck on them.

Why am I obsessed? DRY ERASE. I can literally write any phonics sound on them and then wipe it off and make it a new one the next week. They’re also removable so you can just peel them off if you want to put them somewhere else.


I use these on everything because they’re just so easy to write/wipe or peel off if I don’t want them on something anymore. They’re great for labeling buckets, centers, cubbies, etc. especially if you have students moving a lot, use a wet erase marker to label their cubbies with these instead so you can switch names easily.

Here I just write and wiped the SH / CH sort to make it a Nouns / Verbs sort in about 5 seconds :)


Kids love using dry erase markers too so I try to let that happen whenever possible. A teacher trick I LOVE is to put worksheets in heavy duty sheet protectors in a binder then let kids use dry erase markers to do the worksheets. It just makes it seem ten times more fun for some reason.


This is actually out of one of my Phonics Sound Binders which I plan on writing a post all about them soon to show how I have a binder for each phonics sound that kids can grab and work on that particular phonics sound. This is the Long i binder. All they need is the binder and a dry erase marker. 

I also plan on showing you this teacher trick in that post but here’s a sneak peek – use a roll of fastener tape to create reusable centers in your binder from regular worksheets instead of having to deal with scissors and glue. You definitely need heavy duty sheet protectors for this, not just regular ones, or they may rip when kids pull off the pieces. I also showed how I do this for math in my Fact Fluency post.


Both those worksheets are from my Long I No Prep pack – I have them for almost every phonics sound. If you go to my Literacy page, you can see all the sounds I have them for. I show a lot of the fun activities from them in the digraphs and other literacy posts I mentioned earlier.

I love fun hands on worksheets but I also love to do a lot of hands on centers which I think is a teach trick in and of itself :) Prefixes aren’t a lot of fun by nature but they can be if you have a lot of visuals and games. Check out my prefixes and suffixes post for examples of what I mean!

You can also switch up activities you already have by using them in different ways. If you read my CVC Bottle Cap Word Building post, you saw how I use recycled bottle caps for differentiated word building phonics centers. Well I also use them for a small groups game!

All you need are the Bottle Cap Center word cards for whatever phonics sound you’re working on and some red/yellow counters. 


Print out the version that has ALL the letters in the circles (none missing) and cover up as many as you want with counters. You could do just beginning sounds, just vowel sounds, just ending sounds, all the sounds, whatever!

Have the student put their finger on the counter and say the sound it is then slide it off to check. If they’re correct, they get to keep the chip. If not, it just goes back in the pile. Whoever has the most chips at the end of the game wins (or it can just be fun collecting chips)!


This can be a really fun game to play in small groups, especially for struggling students, and it’s so easily differentiated by how many/which letters you cover.

Like I said, I have these cards for just about every phonics sound so you can play the game all year. It’s also a great game or activity to have parent volunteers do with struggling kids because it’s easy and fun.

Another helpful trick for struggling students is using a storage bag with a slider to practice ABC order.


Simply use a permanent marker to write the alphabet across a bag then give it to students with their worksheet. Teach them to start at the first letter (A) to see if any words start with A. If they find one, they write it down; if not, they slide to the B and check for words that start with B and so on. It’s really helpful for students who struggle with putting words in ABC order.


That sheet is out of my Long A No Prep pack – there are ABC order sheets in all of them, though, so you can practice it weekly with each phonics sound. It’s one of those skills that most kids usually get but need to practice often to keep fresh so I like to practice it every week with the new phonics sound(s).

Okay so one of my FAVORITE tricks is a genius idea I saw from Sweet Sounds of Kindergarten that helps A TON with the frustration and mess of rough drafts and copy them into final drafts. Behold…. the clipbord stand!


Take any clipboard and turn it into a stand! Seriously classroom changing. They can just clip their rough draft onto it and have it right in front of them to copy into a final draft so they’re not shuffling papers. AND… it doesn’t get lost. An edited rough draft that gets lost is even more devastating than a lost glue stick cap (the horror!), am I right?! 

All you do is buy an 8 x 10 picture frame (go to the dollar store or clearance sections to find them cheap) and take the back out of it and adhere it to the back of a clipboard and it’s done!


I actually just doubled up strong tape to adhere mine but you could probably hot glue gun it or something if you wanted. It is seriously the best! 

I have no prep writing crafts for a ton of different themes, holidays, and writing genres that I like to do each week. They’re quick and easy to make and they make really cute bulletin boards so I usually like to do a rough draft first so this is perfect for that. If you want to check out the writing crafts I do, I have a post for most months showing that month’s crafts :) Just click on the month you want: January, February, March, April, October, November, or December. 

I also use clipboard stands to display center directions!


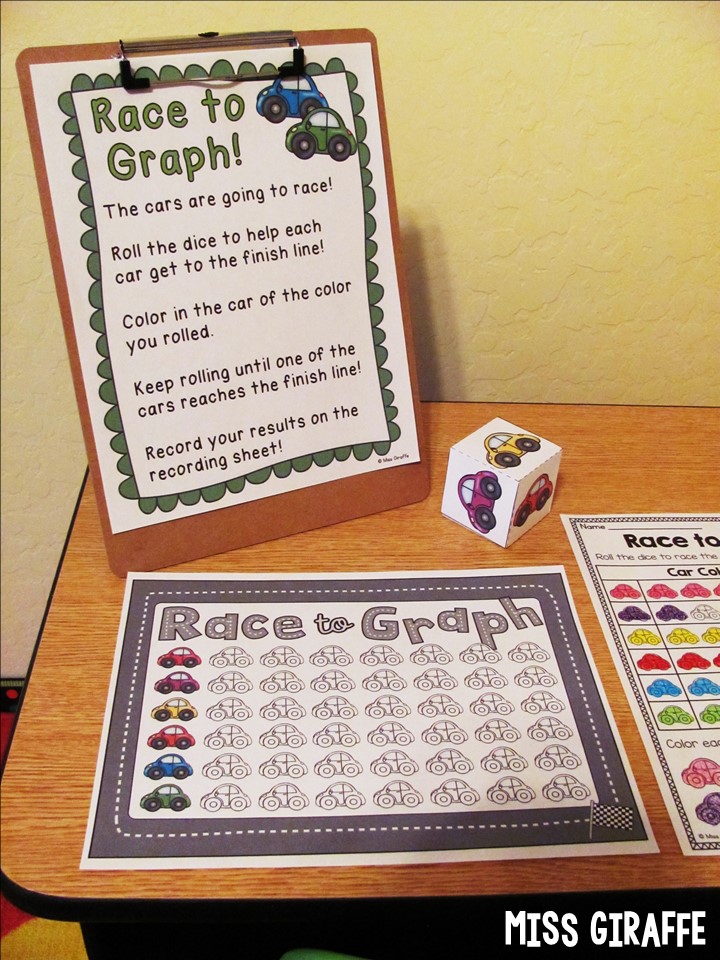
The centers in my first grade math units have directions so I just clip them onto the clipboard stand to easily make any desk an independent center! This game is Race to Graph from Unit 16: Graphing and Data Analysis which you can see the other activities in action on my Graphing post about that unit. It has a lot of other pictures and ideas – if you go to my MATH page, I actually have a lot of different math posts by concept (place value, adding 3 numbers, etc.) that you can click on from that page. 

Okay more tricks!

Do you ever receive notebooks from parents or donations but they’re college ruled? Well I still use them! Just teach kids to draw a line covering 2 lines, then skip one, a line covering 2 lines, skip one, etc. It’ll take a second to teach them at first but most will get it pretty quick, especially if you do it often. For younger kids, you can do it for them – but it creates nice and big space for kids to practice correct handwriting formation… and you don’t feel like you have a cabinet full of notebooks you can’t use! :)


Another handwriting trick is to use a highlighter to create instant tracing worksheets. If you have a kid who struggles with handwriting or even just a certain letter, you can just write in highlighter and have them trace it with a pencil.


You can also just create instant worksheets at your small groups table to practice sight words, spelling words, whatever! It’s nice because you can really tailor it to them without even using a computer.

One more trick for this post! File your books to read aloud by month! I just get a little magazine holder type bin (like the ones on top of my rainbow drawers) for each month and put my special books for reading aloud in it. It makes it so easy to pull books to read or to quickly fill your display bookshelf if you have one each month. For example, spread out your classroom management books between your August and September bins, your Halloween books in the October bin, etc.  

Okay so that’s all the reading and writing tricks I’m sharing with you today! Like I said above, I have A LOT of posts planned for more teacher tricks. If you scroll down the right hand side of my blog, there are a lot of different ways to follow me and my blog so you don’t miss out! If you try any of these tricks, I’d love to hear about it in the comments below!! I hope you found them helpful! :)