February writing prompts are fun! Valentine's Day, Chinese New Year, Groundhog Day, and Presidents' Day are all fun things to learn and write about so I love February for making writing crafts and would love to share some of them with you! :)
First up is Groundhog Day!
It's such a fun holiday because groundhogs are cute, obviously, and there is a lot of great prediction practice you can do which can lead to great graphing practice in math (Do you predict he will see his shadow? Yes/No bar graphing, tally charts, etc.), talking about the weather or learning about groundhogs in science, and - of course - fun writing!
For this craft, you can have students write about Groundhog Day OR have them make a prediction as to whether or not he will see his shadow and write about that as an opinion piece.
Another really fun February holiday to learn about is Chinese New Year!
It's an awesome opportunity to learn about other cultures and how holidays are celebrated around the world. Plus, who doesn't love dragons?!
Next up is Valentine's Day!!
These super cute Valentine's Day crafts are FREE in my store! Go grab them! :)
I also have free Día de San Valentín crafts for those of you who teach in Spanish!
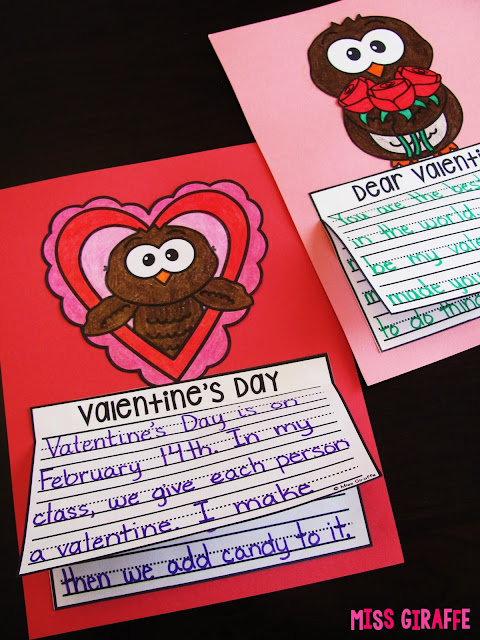
This little owl is Oliver and you may have seen him pop up in my other writing activities before :) I used him for these so students can write about Valentine's Day.
I also thought he'd make an adorable AND EASY parent gift. It's always hard to scramble to make cute crafts for parents for holidays and this one students just write, color, cut, and glue to make something for their valentine (mom, grandma, aunt, etc.)...
and that leaves Presidents' Day!
I really enjoy learning about Presidents' Day. Kids love learning about George Washington, Abraham Lincoln, and about America. There are a lot of fun presidents facts out there to make it a fun topic.
I made some easy crafts where they can write about Presidents' Day- what it is and why we celebrate it.
If you teach facts about George Washington or Abraham Lincoln, these are fun ways for students to show their learning and practice their nonfiction writing skills.
For a little bit of creative writing fun, have them imagine what it'd be like if they lived in the White House. What would they do? It's a really fun topic to brainstorm together!
Once you've got their brains swirling with ideas, have them go back to their seats to write what they would do!
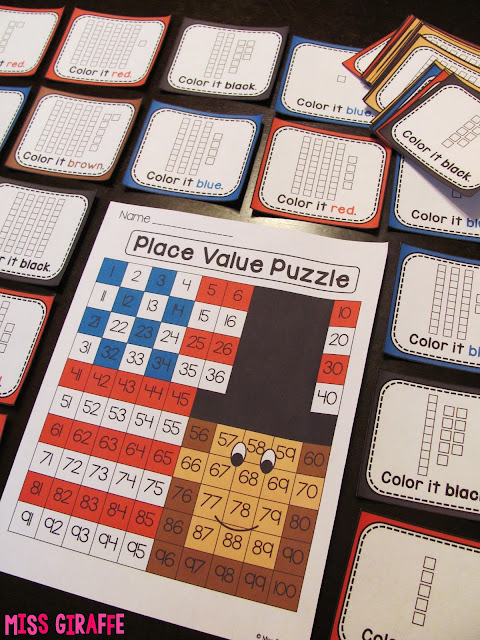
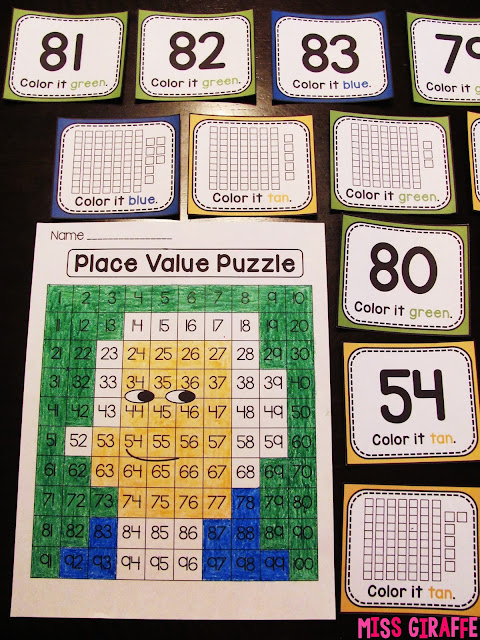
If you are learning about Abraham Lincoln or George Washington, a way to integrate it into math is with my place value puzzles. For these, kiddos look at each card, figure out what the number is in base 10 blocks, then color it the color it says to on their sheet... which will reveal a picture of Abraham Lincoln!
It's great place value practice! I also made an entire set with JUST numbers for number sense building which is a lot of great practice for finding numbers on a hundred chart.
You can get this puzzle here: Abraham Lincoln Place Value 100 Chart Puzzle
Spanish: Día del Presidente Rompecabezas de Valor Posicional {Lincoln}
I also have one for George Washington!!
You can get this puzzle here: George Washington Place Value 100 Chart Puzzle
Spanish: Día del Presidente Rompecabezas de Valor Posicional {Washington}
Hope you have a ton of February writing and learning fun!!!!
You can check out my other monthly writing crafts in these posts:
January Writing Crafts
March Writing Crafts
April Writing Crafts
December Writing Crafts
November Writing Crafts
October Writing Crafts
Follow me on Pinterest for more teaching ideas!
Also - don't forget to join Miss Giraffe's Class so you never miss out on fun ideas and exclusive free stuff from me only for subscribers!
Making a 10 to Add
Making a 10 to Add is a great math strategy to help students mentally add bigger numbers. It's a skill I picked up somewhere along the way in elementary school and have used on a daily basis ever since. I never realized I was composing and decomposing numbers but I've done it all my life and it's so helpful!
That being said, holy moly is it a hard concept for some kids to grasp!
If you can guide them there, though, I think it's a great mental math strategy for them to have in their toolkit. So I'm going to try to explain, step by step, how to get them there. :)
1) Master all facts within 10, especially making 10
I wrote a huge blog post recently with a ton of ideas and resources for how to build students' fact fluency. There's really no way getting around this step - they have to be fluent in their facts to truly use this strategy. If they're not there yet, keep working on it before you attempt the next steps.
2) Adding to 10
The next step is that students need to learn how to add one digit numbers to 10.
This step is WAY easier because students are pretty quick to realize that they just replace the 0 with the number. It's good to explain why, too, with base 10 blocks. Get out the base 10 blocks and show them a problem like 10 + 4. Show them how 10 has no ones so when you add 4 ones to it, it simply becomes the ones place.
A great way to show this is for them to put the numbers on top of the 0s as well. I made some cut and paste activities where they simply paste the number on top of the 0 to replace it.
Then, to build their automaticity, center games like Rollin' Facts are a great way to practice the skill over and over but in a way they think is just a game. :)
You may remember this game from my fact fluency post because I have it for all the numbers 0-10. It's just an awesome station! They can play it over and over and it's always different. In order to make it a game, you can have students partner up and each roll dice. Whoever made the bigger number gets to circle their number sentence and the person with the most circles when the page is full wins.
Then, of course I recommend doing worksheets to practice and also to assess. If you're familiar with my math units, you know I give every worksheet in 3 levels: on level (B), below level (A), and challenge level (C). You can always see what level a worksheet is by looking in the star in the upper right corner.
My worksheets also have the self-assessment at the bottom so they can tell you how they felt they understood the concept - that's a whole other blog post though! :)
3) Adding 9 (moving 1 to make 10)
Woohoo! Now they're ready for a little compensation practice now!
I recommend starting with JUST 9 where they take 1 from the number they're adding to 9 to make a 10 and practice that A LOT. A lot a lot a lot.
To show them what you mean, use twenty frames and red and yellow counters to demonstrate what exactly you're doing. If you tell them to just move the number, they're going to look at you like you're crazy. :)
First, have students take a problem strip. Next, have them build each number in its own ten frame in a different color like this:
Then, tell them since adding 10 is so easy, we could make the problem so much easier if we made the 9 into a 10. Show them how you can just move the yellow chip from the second number to the 9 to make it a 10. DO NOT FLIP IT. You want them to be able to see that it's borrowed. Now ask them what the problem is now and guide them that it's now 10+4. Talk about how you borrowed 1 from the 5 and made it a 4 to give it to the 9 to make it a 10. I know it may sound confusing but they'll get it when you show them how you're borrowing from one number to give to another.
Last, have them write the new number sentence at the bottom. Practice with several problem strips until you think they've got it. This is definitely a concept I recommend introducing in small groups rather than whole group so you can watch each child move the piece and "change" the problem.
Once you feel like they have it down, give them a worksheet on their level to practice the skill.
A lot of them will still need the ten frames at this point. Give them something small like 2 different kinds of beans or any small thing they can use as counters to use with the ten frames at the top of their worksheet. Have them build the problem then physically move one over to make a ten.
Then it's time for centers to hopefully have it become a mental math skill for them!
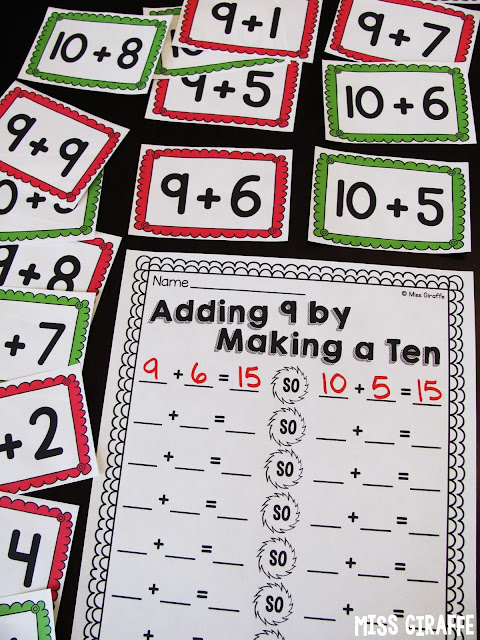
For this center, kids simply match the cards that show an original adding 9 problem and the card that moved 1 to make a 10. For example, they would match the 9+6 card to the 10+5 card like this:
Then, they write the problem on their recording sheet like this to solidify it:
I also have cut and pastes of course because I do cut and pastes for everything :)
The more practice with this skill they get, the better! It's a really important step in them understanding the mechanics of making a 10 before jumping in to do it with any number so make sure you spend an adequate amount of time on it.
The goal is for them to understand what they're doing but also for it to become a mental math strategy. If you ask them 9+5, they should quickly be able to move the 1 in in their head to make it 10+4 and know it's 14 right away because of it.
Okay... so now we're ready for.... [drumroll please]
4) Making a 10 to Add!
First, bring out the twenty frame mat and red and yellow counters again!
Remind them about how you borrowed from a number to make a 10 when adding 9. Explain that you can borrow as many as you need to in order to make a 10.
Have them take a problem strip and build both numbers in its own frame like this:
Then ask: how many more do we need to add to 7 to make 10?
If they know their facts to 10, especially those that make 10, they should be able to tell you that they need 3 because 3 and 7 makes 10. They'll also be able to confirm that visually by seeing that there are 3 spots empty in their top ten frame. If any of your kids need more help with this, review Making 10 (Chapter 3.3 in First Grade Math Unit 3) with them.
When they tell you 3, have them slide the yellow counters into the top frame to fill it. Don't flip them so they can see they're borrowed, just like you did with adding 9.
Now ask them what their problem is now. This part is important! They made a 10 so they should be able to tell you that their problem is now 10 + 3 because there is a full ten frame and 3 left over in another ten frame. Keep practicing until all these steps are quick.
You can also use other fun things instead of red and yellow counters like fuzzy balls or mini erasers:
Okay so now they're hopefully ready to put it into practice!
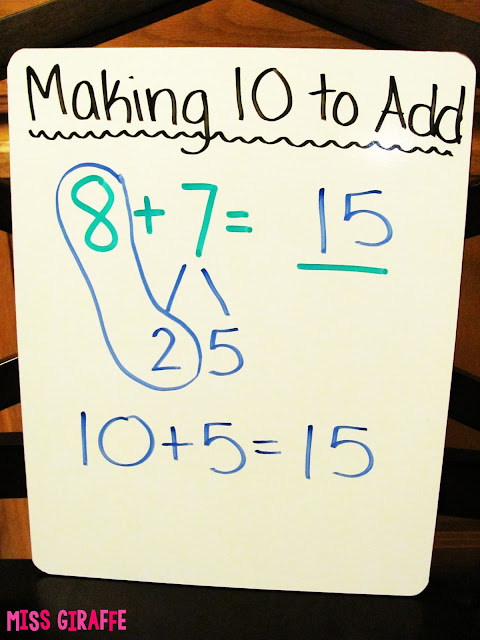
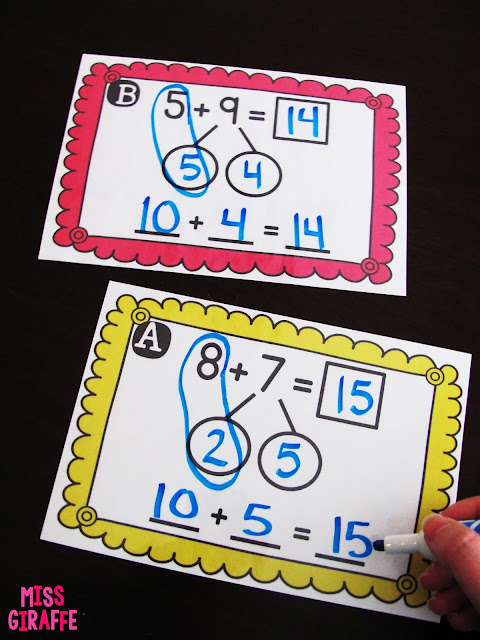
Show them a problem. Have them look at the first number (in this example: 8) and ask them how many more they need to make 10.
When they tell you 2, tell them you're going to borrow 2 from the other number to make the first number 10 to make it easy to add. Next, ask them if the number they're borrowing from is 2 or if they'll have numbers leftover, to which hopefully they'll say yes.
Draw 2 lines from the number like above and write a 2 under one of the lines. Ask them: "What do you have to add to 2 to get 7?" Again, this is where their fact fluency from Step 1 becomes really important! They should be able to tell you 5 because 2 and 5 makes 7. You can do this with red and yellow counters for students who are really struggling. Put out 7 red counters and have them flip over 2 so they now have 2 yellow counters and 5 red counters to show how 2 and 5 makes 7.
Once they tell you that 2 and 5 make 7, write the 5 at the end of the next line so it now shows 7 is 2 and 5 like above.
Circle the 8 and 2 to show that you put them together to make a 10. Point out how the 5 is leftover.
So that makes the new problem 10 + 5 = 15.
Practice this with them a lot until they get quick at it.
I recommend practicing with this center... Make a Ten to Add!
Laminate the cards and give students dry erase markers. Have them do the steps themselves on the card: Look at the first number and figure out how many more to make 10, break apart the 2nd number to give it that number, circle the 10 they made and add it to the leftover number, write their new addition sentence.
When you feel like they are ready to practice independently, give them a worksheet at their level.
For your students who need a little bit of extra help, give them the worksheets with ten frames on them and let them use 2 different kinds of something small like mini erasers to help them solve the problems.
No matter what level worksheet they do, have them show their work where they decompose the numbers, circle the numbers to compose a 10, etc. so you can see that they're doing the steps.
Aaaaand cutting and pasting fun because, well, of course :)
So this is another way to make 10 to add that is a little bit different than above but is another GREAT strategy!
Kids can even use this with bigger numbers as they get older. I personally use this strategy any time I do mental math! For example they could do 54+3 by making tens by turning 54 into 50 then adding 50 + (4+3).
Remind students how they know their 10 facts (10+4=14, 10+5=15, etc.) and show them how they already know that 14 is 10 and 4 because 14 is a ten and 4 ones. Then, show them how they can use that to add numbers to 20 in their head.
Using the whiteboard example I show above... 14 + 2 =
Show them how they can break apart 14 into 10 and 4. Then, show them how they have 2 left over so now they have 10 + 4 + 2. Well they know 4 + 2 is 6 because that's a fact they know so then they just have to add 10 and 6 which they know is 16. Easy! Do the circling and all that good stuff like I showed above. I actually think this strategy is easier for them than the other making a ten to add strategy but equally important.
I made cards for these too to practice!
Do the same thing for these where they use a dry erase marker to write on them to figure out the answer, record on their recording sheet, then wipe off when they're done!
As well as a full set of differentiated worksheets of course!
This is definitely a skill that requires a lot of practice so I recommend having all students start at level A to work with the twenty frames and then have them work their way through the level B worksheets without the support. Give level C to those who need a challenge. Once they get it, this one can become really automatic for some kids.
Now it's assessment time to see how well they understood!
I hope this has helped you feel more confident to teach making a 10 to add!
If you have any questions, feel free to ask - I'm happy to help! If you want to share what you do to teach this difficult skill in the comments, I'd love that as well! The more we all help each other, the better mathematicians the world will have when these littles grow up :)
If you want the activities from this post, you can get EVERYTHING I showed in this post as well as the materials in the fact fluency post I talked about in my First Grade Math Unit 10.
Want to read more MATH ideas from me?
Check out some of these fun posts:
Building Number Sense
Place Value
Telling Time
Fractions
Adding 3 Numbers
Fact Fluency
Money (available in U.S., Australian, Canadian, and U.K. coins!)
Graphing and Data
Follow me on Pinterest for more teaching ideas! Also, feel free to pin this or any of the other example pictures from this post to save for later!
Also - don't forget to join Miss Giraffe's Class so you never miss out on fun ideas and exclusive free stuff from me only for subscribers!
That being said, holy moly is it a hard concept for some kids to grasp!
If you can guide them there, though, I think it's a great mental math strategy for them to have in their toolkit. So I'm going to try to explain, step by step, how to get them there. :)
1) Master all facts within 10, especially making 10
I wrote a huge blog post recently with a ton of ideas and resources for how to build students' fact fluency. There's really no way getting around this step - they have to be fluent in their facts to truly use this strategy. If they're not there yet, keep working on it before you attempt the next steps.
2) Adding to 10
The next step is that students need to learn how to add one digit numbers to 10.
This step is WAY easier because students are pretty quick to realize that they just replace the 0 with the number. It's good to explain why, too, with base 10 blocks. Get out the base 10 blocks and show them a problem like 10 + 4. Show them how 10 has no ones so when you add 4 ones to it, it simply becomes the ones place.
A great way to show this is for them to put the numbers on top of the 0s as well. I made some cut and paste activities where they simply paste the number on top of the 0 to replace it.
Then, to build their automaticity, center games like Rollin' Facts are a great way to practice the skill over and over but in a way they think is just a game. :)
You may remember this game from my fact fluency post because I have it for all the numbers 0-10. It's just an awesome station! They can play it over and over and it's always different. In order to make it a game, you can have students partner up and each roll dice. Whoever made the bigger number gets to circle their number sentence and the person with the most circles when the page is full wins.
Then, of course I recommend doing worksheets to practice and also to assess. If you're familiar with my math units, you know I give every worksheet in 3 levels: on level (B), below level (A), and challenge level (C). You can always see what level a worksheet is by looking in the star in the upper right corner.
My worksheets also have the self-assessment at the bottom so they can tell you how they felt they understood the concept - that's a whole other blog post though! :)
3) Adding 9 (moving 1 to make 10)
Woohoo! Now they're ready for a little compensation practice now!
I recommend starting with JUST 9 where they take 1 from the number they're adding to 9 to make a 10 and practice that A LOT. A lot a lot a lot.
To show them what you mean, use twenty frames and red and yellow counters to demonstrate what exactly you're doing. If you tell them to just move the number, they're going to look at you like you're crazy. :)
First, have students take a problem strip. Next, have them build each number in its own ten frame in a different color like this:
Last, have them write the new number sentence at the bottom. Practice with several problem strips until you think they've got it. This is definitely a concept I recommend introducing in small groups rather than whole group so you can watch each child move the piece and "change" the problem.
Once you feel like they have it down, give them a worksheet on their level to practice the skill.
A lot of them will still need the ten frames at this point. Give them something small like 2 different kinds of beans or any small thing they can use as counters to use with the ten frames at the top of their worksheet. Have them build the problem then physically move one over to make a ten.
Then it's time for centers to hopefully have it become a mental math skill for them!
For this center, kids simply match the cards that show an original adding 9 problem and the card that moved 1 to make a 10. For example, they would match the 9+6 card to the 10+5 card like this:
Then, they write the problem on their recording sheet like this to solidify it:
I also have cut and pastes of course because I do cut and pastes for everything :)
The more practice with this skill they get, the better! It's a really important step in them understanding the mechanics of making a 10 before jumping in to do it with any number so make sure you spend an adequate amount of time on it.
The goal is for them to understand what they're doing but also for it to become a mental math strategy. If you ask them 9+5, they should quickly be able to move the 1 in in their head to make it 10+4 and know it's 14 right away because of it.
Okay... so now we're ready for.... [drumroll please]
4) Making a 10 to Add!
First, bring out the twenty frame mat and red and yellow counters again!
Remind them about how you borrowed from a number to make a 10 when adding 9. Explain that you can borrow as many as you need to in order to make a 10.
Have them take a problem strip and build both numbers in its own frame like this:
Then ask: how many more do we need to add to 7 to make 10?
If they know their facts to 10, especially those that make 10, they should be able to tell you that they need 3 because 3 and 7 makes 10. They'll also be able to confirm that visually by seeing that there are 3 spots empty in their top ten frame. If any of your kids need more help with this, review Making 10 (Chapter 3.3 in First Grade Math Unit 3) with them.
When they tell you 3, have them slide the yellow counters into the top frame to fill it. Don't flip them so they can see they're borrowed, just like you did with adding 9.
Now ask them what their problem is now. This part is important! They made a 10 so they should be able to tell you that their problem is now 10 + 3 because there is a full ten frame and 3 left over in another ten frame. Keep practicing until all these steps are quick.
You can also use other fun things instead of red and yellow counters like fuzzy balls or mini erasers:
Okay so now they're hopefully ready to put it into practice!
Show them a problem. Have them look at the first number (in this example: 8) and ask them how many more they need to make 10.
When they tell you 2, tell them you're going to borrow 2 from the other number to make the first number 10 to make it easy to add. Next, ask them if the number they're borrowing from is 2 or if they'll have numbers leftover, to which hopefully they'll say yes.
Draw 2 lines from the number like above and write a 2 under one of the lines. Ask them: "What do you have to add to 2 to get 7?" Again, this is where their fact fluency from Step 1 becomes really important! They should be able to tell you 5 because 2 and 5 makes 7. You can do this with red and yellow counters for students who are really struggling. Put out 7 red counters and have them flip over 2 so they now have 2 yellow counters and 5 red counters to show how 2 and 5 makes 7.
Once they tell you that 2 and 5 make 7, write the 5 at the end of the next line so it now shows 7 is 2 and 5 like above.
Circle the 8 and 2 to show that you put them together to make a 10. Point out how the 5 is leftover.
So that makes the new problem 10 + 5 = 15.
Practice this with them a lot until they get quick at it.
I recommend practicing with this center... Make a Ten to Add!
Laminate the cards and give students dry erase markers. Have them do the steps themselves on the card: Look at the first number and figure out how many more to make 10, break apart the 2nd number to give it that number, circle the 10 they made and add it to the leftover number, write their new addition sentence.
When you feel like they are ready to practice independently, give them a worksheet at their level.
For your students who need a little bit of extra help, give them the worksheets with ten frames on them and let them use 2 different kinds of something small like mini erasers to help them solve the problems.
No matter what level worksheet they do, have them show their work where they decompose the numbers, circle the numbers to compose a 10, etc. so you can see that they're doing the steps.
Aaaaand cutting and pasting fun because, well, of course :)
So this is another way to make 10 to add that is a little bit different than above but is another GREAT strategy!
Kids can even use this with bigger numbers as they get older. I personally use this strategy any time I do mental math! For example they could do 54+3 by making tens by turning 54 into 50 then adding 50 + (4+3).
Remind students how they know their 10 facts (10+4=14, 10+5=15, etc.) and show them how they already know that 14 is 10 and 4 because 14 is a ten and 4 ones. Then, show them how they can use that to add numbers to 20 in their head.
Using the whiteboard example I show above... 14 + 2 =
Show them how they can break apart 14 into 10 and 4. Then, show them how they have 2 left over so now they have 10 + 4 + 2. Well they know 4 + 2 is 6 because that's a fact they know so then they just have to add 10 and 6 which they know is 16. Easy! Do the circling and all that good stuff like I showed above. I actually think this strategy is easier for them than the other making a ten to add strategy but equally important.
I made cards for these too to practice!
Do the same thing for these where they use a dry erase marker to write on them to figure out the answer, record on their recording sheet, then wipe off when they're done!
As well as a full set of differentiated worksheets of course!
This is definitely a skill that requires a lot of practice so I recommend having all students start at level A to work with the twenty frames and then have them work their way through the level B worksheets without the support. Give level C to those who need a challenge. Once they get it, this one can become really automatic for some kids.
Now it's assessment time to see how well they understood!
I hope this has helped you feel more confident to teach making a 10 to add!
If you have any questions, feel free to ask - I'm happy to help! If you want to share what you do to teach this difficult skill in the comments, I'd love that as well! The more we all help each other, the better mathematicians the world will have when these littles grow up :)
If you want the activities from this post, you can get EVERYTHING I showed in this post as well as the materials in the fact fluency post I talked about in my First Grade Math Unit 10.
You can get Unit 10 in the First Grade Math Units 10-18 Bundle too if you want even more of these units for other skills! :)
Check out some of these fun posts:
Building Number Sense
Place Value
Telling Time
Fractions
Adding 3 Numbers
Fact Fluency
Money (available in U.S., Australian, Canadian, and U.K. coins!)
Graphing and Data
Follow me on Pinterest for more teaching ideas! Also, feel free to pin this or any of the other example pictures from this post to save for later!
Also - don't forget to join Miss Giraffe's Class so you never miss out on fun ideas and exclusive free stuff from me only for subscribers!
Labels:
math centers,
math units
January Writing Crafts
January writing is a ton of fun - penguins, polar bears, and snow - oh my! :)
So it's just not winter without learning about penguins.
Follow me on Pinterest for more teaching ideas!
Hope you have a ton of January and winter learning fun!!!!
You can check out my other monthly writing crafts in these posts:
February Writing Crafts
March Writing Crafts
April Writing Crafts
October Writing Crafts
November Writing Crafts
December Writing Crafts
Also - don't forget to join Miss Giraffe's Class so you never miss out on fun ideas and exclusive free stuff from me only for subscribers!
So it's just not winter without learning about penguins.
I LOVE learning about winter animals. Polar bears are also a ton of fun!
These are great for students to practice nonfiction writing and show what they've learned about penguins and polar bears. You could also have them compare and contrast penguins and polar bears and write about each OR make it an opinion writing activity where you ask them which of the 2 animals is better or which is their favorite and have them write their opinion.
I also like to throw in some creative writing, too, because kids just love winter animals and can write such imaginative stories about them for some reason!
I think imagining they had a penguin or a polar bear for a pet is always a fun activity! It's a good one to brainstorm together on the carpet - what would you and your penguin do? What would his/her name be? Would you bring them to school?
Speaking of creative writing, there is just a ton of creative writing you can do for winter time!
One of my favorite writing prompts is "If it Snowed Ice Cream" because I mean, how awesome would that be? Creative writing is great for practicing sequential writing - first, I would... next, I would... then, I would.. last, I would.. or whatever sequencing words you teach.
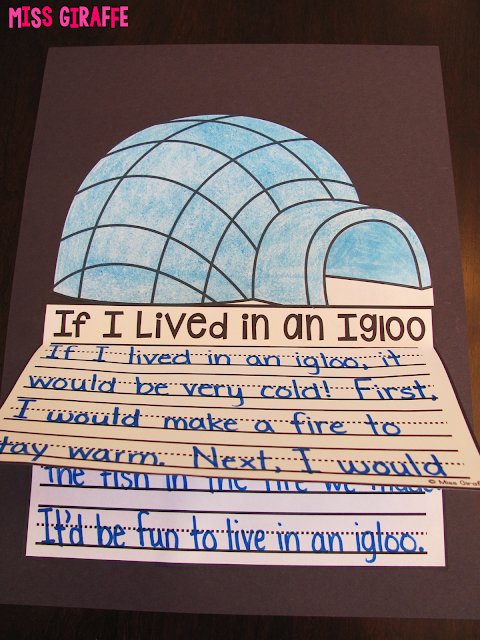
What if they lived in an igloo? This is a great time to talk about different homes people around the world live in. You can do great comparing activities of what it'd be like to live in an igloo vs. a house. Then, they can write about what it'd be like if they lived in an igloo!
Or what if a snowman came to school?? That's another fun writing prompt that gets students' imaginations going.
For more snowman fun, they can practice how to writing by explaining how to build a snowman.
Another fun how to writing prompt is how to make hot cocoa!
I also make other simple prompts like how to ski, how to ice skate, etc. in case there is extra time in the day and you want to just do a quick writing activity. You can always just give them the sheet of these to write and color and skip the cutting and gluing part if you want to just give a quick write type activity.
I don't know if you've met Oliver from any of my other packs but this is Oliver the owl and he is quite a cutie! He does a lot of little adventures so this one is about Oliver getting a snow day at school and what he does. I think it's fun to have a character who pops up for various holidays and moments so kids feel a connection to him and what they're writing about. I recommend a cute owl stuffed animal who looks like him named Oliver to have in the classroom to let students who are writing quietly and focused hold him while they write. It's an awesome classroom management trick that's easy - if you see someone working really hard on their writing, put Oliver on their desk. They know they get to cuddle with him for a few minutes and when you come back to their desk, they know to give Oliver a hug and hand him back to you - when you see someone else working really hard, they get him next! Talk about some focused writers you'll have :)
Another fun one is writing about magic mittens. Bring in a pair of mittens and say you found them and THEY'RE MAGIC. When I put on my magic mittens, I can talk to animals. Oooh. Ahhh. Have them pretend they found a pair of magic mittens on the ground and think about what happens when they put their magic mittens on. What do theirs do? Can you tell I love creative writing?
You can grab ALL of these crafts I showed above in my Winter Writing Crafts Bundle!
Some of them like the Penguins, Polar Bears, How to Build a Snowman, and Hibernation I also have separately but it's a way better deal to get the bundle :)
I also made some of these crafts in Spanish too!!
Hope you have a ton of January and winter learning fun!!!!
You can check out my other monthly writing crafts in these posts:
February Writing Crafts
March Writing Crafts
April Writing Crafts
October Writing Crafts
November Writing Crafts
December Writing Crafts
Also - don't forget to join Miss Giraffe's Class so you never miss out on fun ideas and exclusive free stuff from me only for subscribers!
Labels:
winter,
writing crafts
Subscribe to:
Posts (Atom)


